Western Blot Doctor™ — Blot Background Problems

The Western Blot Doctor is a self-help guide that enables you to troubleshoot your western blotting problems. In this section, you can find solutions to problems with blot background signal.

Other sections in the Western Blot Doctor:

Problems and Solutions

Click on the thumbnail that is most representative of your own blot to discover the probable causes and find specific solutions to the problem.


Problem: White spots or regions on blot

Back to Top
White spots or white areas on the blot may be due to trapped air bubbles or unwetted membrane areas where protein will not bind. Both can be prevented with care.
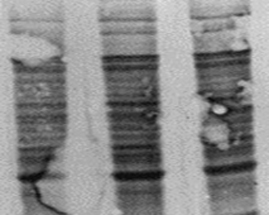
 A blot with air bubbles – Western Blot Doctor - Protein Transfer Issues
Possible causes: Solutions:
Improper assembly of transfer sandwich, trapped air bubbles
  • Carefully remove air bubbles between the gel and the membrane before protein transfer using a roller or glass rod
  • Use more buffer when assembling transfer sandwich. Ensure all filter papers and sponges used in assembly are properly saturated and equilibrated with transfer buffer
  • Consider using a rapid transfer pack with the Trans-Blot® Turbo™ Rapid Blotting System to help prevent improper sandwich assembly
  • When using a tank blotter, check the quality of the sponges (foam pads); if a snug assembly can no longer be made between the frames, the pads should be replaced
     

    Foam pads for Bio-Rad wet tank blotting systems:

    As a diagnostic test, you can check transfer quality by imaging proteins on the gel and blot. If planning to use the blot in downstream steps, make sure that your stain can be removed or is compatible with antibody detection. For example, Coomassie and colloidal gold are not compatible with downstream steps (see Bio-Rad Protein Stains and the Protein Stain Selection Guide).

  • To determine if there is residual, untransferred protein remaining on the gel, use a total protein stain on the gel after transfer, e.g., Coomassie, colloidal gold, or SYPRO Ruby
  • To verify protein transfer, stain the membrane with Ponceau S after blotting
  • Visualize total protein on gels and blots using Bio-Rad’s Stain-Free Gels featuring our proprietary Stain-Free Technology)
Overheated buffer
  • High-intensity transfers in tank blotting sample can cause buffer heating, leading to bubble formation; ensure that buffer remains cool
    • Reduce current, and increase transfer time to compensate
    • Perform transfer in tank apparatus placed in ice or a temperature-controlled (4°C) room
    • Chill buffers before use
    • Use a cooling coil or “blue ice” insert in the cell

    Cooling for Bio-Rad Wet Tank Blotting Systems:

Dried out or improperly hydrated membrane
  • Nitrocellulose: White regions on the nitrocellulose membrane indicate dry areas where protein will not bind. If wetting does not occur immediately by immersion of the sheet in transfer buffer, heat distilled water until just under boiling point and soak the membrane until completely wet. Equilibrate in transfer buffer until ready to use
  • PVDF: White regions on PVDF membrane indicate areas where the membrane was either inappropriately prewetted or allowed to dry out. Because of the hydrophobic nature of PVDF, the membrane must be prewetted in methanol prior to equilibration in aqueous transfer buffer. Once wet, do not allow membrane to dry out. If the membrane dries, rewet in methanol and re-equilibrate in TBS-T (caution: may adversely affect downstream detection processes)
See Blotting Membranes and Papers to learn more about the different types available and their properties
 

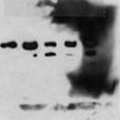
Problem: High background on blot

Back to Top
If you observe high background across the blot, there are a number of likely causes. Careful attention to your handling and protocol steps is required, and multiple trials may be necessary to resolve this problem.
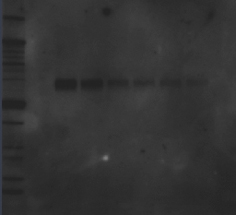
 A blot with a high background – Western Blot Doctor - Background Issues
Possible causes: Solutions:
Incomplete blocking of membrane
  • Increase the concentration of blocker (e.g., 3–5% BSA, casein, or nonfat dry milk)
  • Increase the duration of the blocking step (overnight at 4°C instead of 1 hour at room temperature, or a longer incubation at room temperature)
  • Increase temperature at which blocking is performed, (up to room temp)
  • Use a different blocking reagent (albumin, gelatin, BSA, casein, or nonfat dry milk)
See Bio-Rad Detergents and Blocking Reagents
Contaminated blocking reagent
Incubation with substrate for too long
  • Reduce incubation time with detection substrate
  • If using colorimetric reagent, remove the blot from the substrate solution when the signal-to-noise level is acceptable, and immerse in deionized water
Too much antibody
  • Reduce/optimize primary and/or secondary antibody concentrations
  • Use a dot-blotting trial to optimize antibody concentrations
  • Reduce/optimize incubation times
Contamination in incubation tray
  • Make sure all incubation trays are fully cleaned between experiments
  • Use disposable trays
Problems specific to tank blotters:
  • Excessive protein loading
  • Too much SDS in transfer buffer
(both may cause proteins to pass through blot and recirculate in buffer)
  • Excess protein loading:
  • Reduce the amount of protein on gel
  • Optimize sample loading; see Determining the Appropriate Sample Load for Western Blots Protocol
  • Reduce concentration of SDS in transfer buffer
  • Add second membrane sheet to bind excess protein
Antibody binding to proteins in blocking buffer (e.g., phosphospecific antibody binding casein or secondary antibody binding to blocking reagent)
  • Try other blocking reagents, e.g., albumin, gelatin, BSA, casein, or nonfat dry milk (see Bio-Rad Detergents and Blocking Reagents
  • Do not use milk to block membranes when using avidin-biotin system because milk contains biotin
Insufficient washing between incubation steps
  • Increase length and/or number of washing steps (minimum of 5 x 5 min)
  • Use larger volume of wash buffer
Exposure too long
  • Use a shorter exposure time
  • Use multi-acquisition feature on data acquisition software
  • Film users:
    • Wait 5–10 minutes and then re-expose blot to film (film)
    • Reduce exposure and/or development time (film)
    • Consider switching to a digital imaging system such as Bio-Rad’s ChemiDoc™ Imaging Systems
Membrane dried during blotting procedure incubation steps
  • Make sure membrane is thoroughly wetted when beginning procedure
  • Repeat procedure taking care that the blot does not dry out during any step by using sufficient volumes and agitation throughout
  • Make sure membrane remains submerged in incubation and wash buffers throughout all steps
Antibody activity loss due to long-term or improper storage
  • Use a fresh aliquot of antibody that has been stored at –20°C or below
  • If storing an antibody for a very long period of time may want to store at –80°C
  • Make aliquots of antibody and only thaw one at a time as needed for blots
  • Avoid repeated freeze-thaw cycles
Incubation temperature too high
  • Try a lower incubation temperature such as 4°C
    Note: will need to increase incubation time
PVDF has higher background than nitrocellulose
Insufficient concentration of detergent in the buffers
  • Increase stringency of washing steps:
  • Use TBS containing 0.05–0.1% Tween 20
  • Try a stronger detergent such as NP-40
Contaminated buffers
  • Use fresh buffers
  • Filter all buffers through a 0.2 µm filter before using for washing or blocking and before adding antibody
 

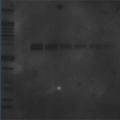
Problem: Blotchy or patchy background

Back to Top
A blotchy background can be due to a dry membrane or insufficient washing; both problems are readily solved by ensuring that the blot is immersed at all times. Additional handling precautions should be taken to prevent accidental contamination from common laboratory sources.
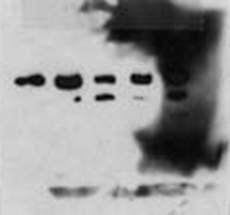
 A blot with a blotchy background – Western Blot Doctor - Background Issues
Possible causes: Solutions:
Uneven agitation during incubations
  • Use a shaker during all incubation steps
Parts of the membrane dried out
  • Make sure membrane is thoroughly wetted when beginning procedure
  • Repeat procedure taking care that the blot does not dry out during any step by using sufficient volumes and agitation throughout. Make sure blot is always submerged
Contamination on blot
  • Do not handle membrane with bare hands. Always wear clean gloves, and handle blots with clean forceps whenever possible
  • Make sure electrophoresis equipment, blotting equipment, and incubation trays are clean and free of contaminants
  • Avoid touching the blot to surfaces
Insufficient access of washing or incubation buffer to areas of the blot
  • Increase washing buffer volume
  • Use a shaker during all incubation and wash steps
  • Avoid stacking blots in a single incubation container
    • When stacking blots in a single incubation container, ensure that sufficient flow of buffer exists between blots. The blots should move freely past each other with agitation during incubation and wash steps
 

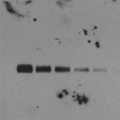
Problem: Uneven spots on blot or speckled background

Back to Top
A speckled or spotty background can be caused by foreign material adhering to the membrane, antibody aggregation, or dirty scanner or cassette surfaces. All are preventable by fastidious handling procedures.
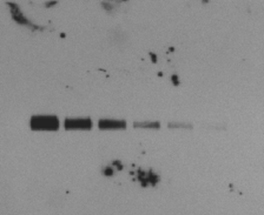
 A blot with a speckled background – Western Blot Doctor - Background Issues
Possible causes: Solutions:
Aggregated secondary antibody
  • Spin secondary antibody and/or filter to remove aggregates
Antibodies binding to blocking reagent/clumps of blocking reagent stuck to membrane
  • Make sure blocking reagent is fully dissolved in buffer prior to use
  • Make fresh buffers if making blocking buffer from dry reagents
  • Check premade blocking buffers for precipitates before use
  • Add 0.05–0.1% Tween 20 to blocking buffer
  • Filter blocking buffer through 0.2 µm filter before use
  • Wash blot with washing buffer before incubation with antibodies
  • Try a different blocking reagent, e.g., albumin, gelatin, BSA, casein, or nonfat dry milk (see Bio-Rad Detergents and Blocking Reagents and more Blocking Reagents)
Gel pieces stuck to membrane
  • Remove all residual acrylamide gel traces from surface of membrane following transfer before proceeding with downstream steps
Dirty scanner or cassette surfaces
  • Check that scanning and cassette surfaces are clean
Buffer contamination
  • Use fresh buffers. Make a new batch of buffer and repeat blot
  • Filter buffers for blocking and washing through 0.2 µm filter
  • Wrapping blots in plastic wrap or heat-sealed bags is a good safeguard against both particulate contamination and blot dehydration at the image acquisition step
 

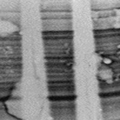
Problem: Gel cassette shadow transferred to blot (tank blotters)

Back to Top
In cases of extended transfer, sometimes the user will observe the pattern of the transfer cassette plastic (or the pattern of the holes) on their blot. This problem is often attributable to the foam pads in the sandwich being too thin or having some sort of protein contamination.
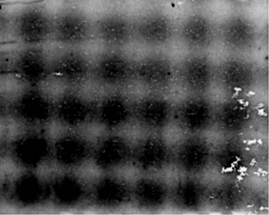
Possible causes: Solutions:
Foam pads are contaminated or too thin
  • Clean or replace foam pads
    • Foam pads for Bio-Rad wet tank blotting systems:
Excessive amount of protein loaded on gel (in a tank blotter, excess protein can pass through and recirculate in buffer)
  • Reduce amount of protein on the gel
  • Optimize sample loading; see Determining the Appropriate Sample Load for Western Blots Protocol
  • Reduce the amount of SDS in transfer buffer
  • Add second membrane sheet to bind excess protein
Transfer buffer contaminated
  • Prepare fresh transfer buffer. Make a new batch of buffer and repeat blot
  • Filter buffers for blocking and washing through 0.2 µm filter
 
Page Contents